
How Aran and Guernsey Knitting Moved From Memory to Symbol Grids
From about 1910 through the mid-1950s, Aran and Guernsey knitters held their knitting patterns in memory or read them off finished wool garments. A maker didn't consult a diagram to work a rope, moss, ladder, or diamond band. When printed leaflets did circulate during those decades, editors packed an entire right-side row into one dense, unbroken paragraph of prose. You couldn't see how a column of stitches stacked up until the wool was already on your needles.
Between roughly 1985 and 1998, Japanese and Continental charting conventions reshaped English-language sweater instructions. One-cell-per-stitch symbol grids—where a six-stitch cable mark spans six cells and an eight-stitch cross spans eight—gave knitters an immediate bird's-eye view of stitch columns. Right-side chart rows read from right to left and wrong-side rows read from left to right, mirroring the physical path of the yarn across the needles.
That visual clarity created a lasting assumption in knitting instruction that charts are universally better for heavy textures. A grid maps the fabric beautifully while the stitch count inside its borders stays fixed. Once full-garment construction introduces multi-panel repeat offsets and sloped shaping, however, a two-dimensional grid starts working against the knitter's eyes.
Why Juggling Multiple Cable Charts Triggers Row-Tracking Errors
Look at the front of a traditional Aran pullover on the needles. You are usually managing a center honeycomb panel on an 8-row cycle, flanking braided cables on a 6-row cycle, moss stitch fillers with no cable crosses, and traveling rope panels on a 12-row cycle. Because 6, 8, and 12 don't align until row 24, you spend 23 consecutive rows without a single shared cable-row check across the needle.
During test knits of heavy Aran pullovers over several seasons, I tracked where knitters had to frog their work. The worst mistakes happened when a knitter's eyes had to jump across three or four separate chart grids during a single needle pass. On right-side rows you read each grid right to left; on the wrong-side return pass, knit and purl symbols invert and most cable crossing symbols disappear, forcing you to re-index three or four separate charts before the next right-side cross. Miss one panel shift, and the error usually hides until that specific panel's next crossing 6 to 12 rows later—meaning the rip goes all the way back across the full width of the sweater.
An isolated cable motif worked on matched row numbers, with no bind-off or decrease entering its edge stitches, doesn't trigger these multi-grid tracking errors. When a garment mixes three different cycle lengths, though, a consolidated line-by-line written row solves the eye-travel problem. It pre-compiles every panel repeat into a single linear sequence using Craft Yarn Council standard stitch abbreviations, letting you work straight across the needle without flipping between separate keys or mentally inverting wrong-side symbols.
Protecting Cable Edges When Armhole and Neckline Decreases Cut In
The most volatile phase of sweater construction begins when armhole bind-offs, raglan slants, or neckline shaping collide with wide cable crossings. On adult worsted Aran bodies, armhole openings commonly start with a bind-off of 4 to 8 stitches at each underarm. After that initial step, raglan or armhole decreases remove 1 stitch at each edge on alternate rows, walking steadily inward across the moss stitch fillers and straight into the anchoring columns of your cables.
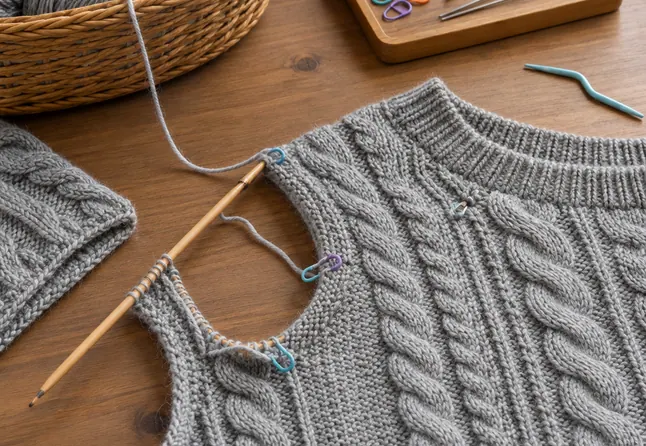
Visual charts handle this inward march poorly. Designers typically rely on two charting workarounds:
- Blank "no-stitch" boxes: Every decreased stitch drawn as an empty gray or white cell shifts every subsequent symbol one cell over relative to the row below, so a cable mark that sat in a tracked vertical column is no longer aligned where your eye expects it.
- Uncharted edge subtraction: The pattern gives you a static motif grid and leaves you to subtract stitches mentally from the outer edges on the fly.
Neither grid method warns you when a decrease eats into the structural foundation of a twist. An 8-stitch braid cannot be crossed as charted once the panel holds fewer than 8 live stitches, because a standard 4-over-4 cross physically requires 4 stitches held on your cable needle and 4 stitches remaining on the left needle. Well-edited written instructions protect the fabric architecture automatically. When the shaping eats into the braid's footprint, the written line drops the impossible 8-stitch cross and converts those remaining stitches into a smaller twist or plain reverse stockinette columns so the edge lies flat.
Working Row 17 of a Shaped Saddle-Shoulder Yoke From Written Text
Put worsted-weight yarn on 4.5 mm to 5.0 mm needles and work Row 17 of an Aran saddle-shoulder yoke. On this single right-side pass, three distinct events collide across your panels, and the three cable grids are each one row out of agreement:
- Your neckline edge requires a 2-stitch decrease right where it meets the outer edge of the 8-stitch flanking braid.
- That 6-row braid normally crosses on row 18 (one row ahead), while the 8-row honeycomb already crossed on row 16 (one row behind), and the neckline decrease has already reduced the braid panel below the 8 stitches needed for a 4-over-4 cross.
- Your central 12-row lattice block—numbered here as rows 6 through 17 due to the lower body setup—lands squarely on row 17, its full crossing row.
Instead of scanning three offset charts and calculating how to handle the truncated braid, you read one consolidated line of text from start to finish. First, you work the selvedge stitch and execute the 2-stitch neckline decrease. Next, the written line addresses the encroached braid panel directly: rather than leaving you stranded with an unworkable 8-stitch symbol, the text instructs you to work a 2-over-2 twist by slipping 2 stitches to the cable needle, knitting 2 from the left needle, and knitting 2 from the cable needle.
From that adjusted edge, the sentence flows straight through the moss stitch filler and into the Row 17 lattice crossing. You work C6F by holding 3 stitches in front on the cable needle, knitting 3 from the left needle, and knitting the 3 held stitches, followed immediately by C6B—holding 3 stitches in back, knitting 3 from the left needle, and knitting the 3 from the cable needle—without ever looking up at a secondary symbol key. Once the saddle and neck decreases finish and the live stitches settle back into a straight section where the 6-row, 8-row, and 12-row panels finally meet at row 24, the written line no longer has to shield a cable cross from a decrease; it did that heavy lifting on Row 17 when the neckline walked into the braid. You swipe a single highlighter mark across the printed line, lock in your exact stitch count, and turn the work for the wrong-side return pass.







Discussion
No comments yet. Be the first!
Write a Comment