
In this Article
- Forty-Two Squares, 168 Tails, and a Better Way to Join
- Choosing Yarn That Holds a Square Corner
- Drawing the Cardigan Grid Before the Border Yarn Goes On
- Working the Join: Chain One, Slip Stitch, Repeat
- Ribbed Edges That Keep Granny Fabric From Dropping
- The 38-Square Worsted Cardigan, Square by Square
Forty-Two Squares, 168 Tails, and a Better Way to Join
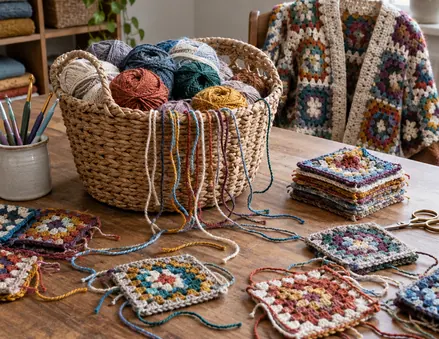
It is a weeknight on the studio sofa. Beside me sits a wooden basket holding forty-two finished granny squares, each one blocked flat and pretty. Every square trails four yarn tails about four inches long. That adds up to 168 ends, all waiting for a tapestry needle.
I timed myself on those samples. Each tail took between 50 and 75 seconds to weave in securely. That works out to somewhere between 2 hours 20 minutes and 3 hours 30 minutes of needlework before a single seam gets sewn. Motif cardigans rarely stall for lack of a lovely square pattern. They stall in that basket.
The fix is structural. When you join each motif to its neighbors while you work its final round, the border yarn does double duty: it finishes the square and attaches it in the same pass. Whip-stitched or slip-stitched seams sewn between finished blocks add a second layer of yarn along every edge. That layer forms a ridge, and the ridge stiffens the fabric exactly where a cardigan needs to bend, across the back and over the shoulders.
Our sample garment team tried motif garments in yarn weights from DK through bulky. In those samples, continuous joins tended to give a softer drape without rigid seam lines and reduced the tail-weaving bottleneck. The 168 tails from that basket disappear once the join moves onto the still-unworked final round, because only the interior rounds ever get fastened off.
Choosing Yarn That Holds a Square Corner
Pick the fiber by how a corner behaves after blocking. Softness in the skein matters far less here.
Non-superwash wool and cotton-linen blends both tend to hold a crisp 90-degree corner. Heavy acrylic corners can round off after unpinning. Bamboo blends can have a different problem: their chain spaces stretch, so opposite sides of the same square stop matching in length. In a grid of joined motifs, one lazy corner pulls on its three neighbors, and the whole panel starts to wave.
Blocking the Interiors
For non-superwash wool, I hold the steam iron about an inch above the square for 15 to 25 seconds, and the iron never touches the fabric. The pins stay in until the square feels cool, which takes 25 to 40 minutes in a room between 65 and 72°F. Cotton-linen centers get wet-blocked instead and dried flat to the same side length as the rest of the set.
Stopping One Round Short
Here is the preparation rule that makes everything else possible: crochet every interior round of every square, block the full set, and leave the final border round unworked. You want your tension settled and your side lengths matched before a shared strand starts tying squares together. Once that border round begins, fixing a short square means unpicking its neighbors too.
Corner Color Carry
A solid-colored final round hides the join cleanly. If your border uses high-contrast multicolor rounds, wrap the new color inside the corner cluster as you work it, so the carried strand stays buried and never flashes through the chain space.
Drawing the Cardigan Grid Before the Border Yarn Goes On
Start with the finished body measurement you want, then work backward to the square size. Defaulting to whatever size the motif pattern happens to produce is how boxy cardigans end up as tents or straitjackets.
The cardigan in this guide uses eight columns around the body: four on the back and two on each front. At 5.5 inches per blocked square, that gives 44 inches of circumference, or 4 to 6 inches of ease on a 38- to 40-inch chest. The same eight-column plan at 5 inches finishes at 40 inches, which leaves almost no ease for a boxy fit. At 6 inches it reaches 48 inches. Half an inch per square shifts the whole garment by four inches, so lock the motif size before you commit any border yarn.
At 5.5 inches, the back measures 22 by 22 inches (4 by 4 squares). Each front measures 11 by 16.5 inches (2 by 3), and the neck gap spans 11 inches, exactly two squares wide. The sleeve rings come out 27.5 inches around and 5.5 inches deep before the cuff rib. If you want to check your yarn weight against standard gauge ranges first, the Craft Yarn Council standard yarn weight and gauge guidelines are a useful reference.
The Snake Path
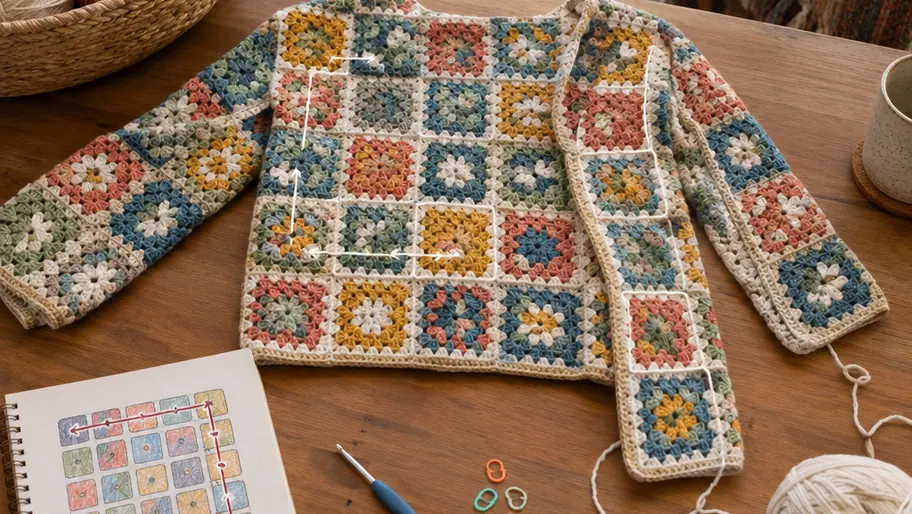
Draw the grid on paper and number the squares in the order you will join them. The path travels like a boustrophedon: right to left across the bottom row of the back, up one square, then left to right across the next row, and so on. Because each row ends directly beneath the first square of the next, the working yarn never has to break at a row's end.
From the top of the back panel, the path climbs over the shoulder and snakes down the right front. Then the strand returns along the shoulder, travels past the two-square neck opening without joining anything there, and starts the left front. Expect the drawing to take one sitting in the range of 25 to 40 minutes. It is the cheapest insurance in the whole project.
Working the Join: Chain One, Slip Stitch, Repeat
The join borrows a stitch the granny round already uses. Work the final round of Square 1 normally until you reach a side that touches a neighbor. Where you would ordinarily chain into the next space, chain 1, then slip stitch into the matching chain space on the adjacent square. Continue the cluster on your own square. No separate seam yarn enters the fabric.
- Work the first motif's final round all the way around; it has no neighbors yet.
- On the second square, work the final round until you reach the shared side.
- At each chain space along that side, chain 1 and slip stitch into the corresponding space on Square 1.
- Finish the remaining sides of the second square as an ordinary border.
- Repeat along the snake path, joining to every finished neighbor you meet.
Where Four Corners Meet
The four-square intersection is where most join-as-you-go projects grow a lump or a hole. My protocol is simple. Pass the hook once through the shared corner space. Add no extra chain, and do not stack a second slip stitch on top of the first. The intersection then stays as thick as a single corner cluster. Before tightening that corner slip stitch, flip the work and check the right side to confirm all four corners sit flat and meet at a point.
Puckering and the Hook Change
Tight joining slip stitches pull the edges of neighboring squares toward each other, and the cardigan body puckers in a quilted grid. The squares were blocked to size, and the join quietly shrank them. The remedy is a half-size jump on the joining round: interiors on a 5.0 mm (H-8) hook, final rounds and joins on a 5.5 mm.
Half-Size Hook Fix
Keep the 5.5 mm hook in a separate case labeled for joining rounds only. It sounds fussy, yet grabbing the wrong hook halfway through the back panel is how one row ends up visibly tighter than the rest.
Ribbed Edges That Keep Granny Fabric From Dropping
Granny fabric is open, and open fabric lengthens under its own weight. An open-front cardigan has no shoulder seam or closed tube to resist that drop. In my notes from the sample bodies, hems left without a firm edge lengthened by roughly an inch after hanging for a week or two. Those figures come from hanging samples; a cardigan that is worn, folded, and moved will settle on its own schedule, though the direction of the change stays the same.
A structured perimeter holds the shape. Do not cut the border strand after the last motif join. Pick up stitches for the front bands, hem, and cuffs from that same yarn. Along the front bands, pick up 3 stitches for every 2 granny clusters. Gather each cuff from the 27.5-inch sleeve ring down to a 7.5- to 8.5-inch opening, and carry the collar and band ribbing 1.5 inches deep.
Post-Stitch Rib or Back-Loop Rib
Two ribbing styles suit motif cardigans, and they behave differently.
- Alternating FPdc/BPdc ribbing builds a thick, sculpted rib with strong vertical lines. It pulls in noticeably and gives a sweatshirt-style cuff. It also uses more yarn per inch and adds weight at the edges.
- BLO single crochet ribbing worked perpendicularly is a short row of single crochet worked back and forth, slip-stitched to the body at the end of each row. It lies flatter, stays lighter, and gives a cleaner front band for buttons. It takes longer, since every row is short.
For a boxy worsted cardigan, I lean toward BLO ribbing on the front bands and collar, where flatness matters, and post-stitch ribbing at the cuffs, where a firm gather earns its weight.
The 38-Square Worsted Cardigan, Square by Square
This blueprint is ready to copy as written. It makes a Medium/Large boxy cardigan from thirty-eight 5.5-inch motifs in worsted-weight Peruvian Highland wool, with interiors on a 5.0 mm (H-8) hook and every interior stopped before the border round.
| Panel | Grid | Square numbers in join order | Blocked size |
|---|---|---|---|
| Back | 4 wide by 4 tall | 1 to 16, starting bottom right | 22 in by 22 in |
| Right front | 2 wide by 3 tall | 17 to 22 | 11 in by 16.5 in |
| Left front | 2 wide by 3 tall | 23 to 28 | 11 in by 16.5 in |
| Right sleeve | 5-square ring | 29 to 33 | 27.5 in around, 5.5 in deep |
| Left sleeve | 5-square ring | 34 to 38, ending at the left cuff | 27.5 in around, 5.5 in deep |
Before You Pick Up the Border Yarn
- Crochet all 38 interiors on the 5.0 mm hook, stopping before the final round.
- Steam-block each square to 5.5 inches, pins in until cool.
- Set aside two 100-gram skeins (a 196- to 220-yard put-up) for the border and collar ribbing only. The sample finished inside the second skein.
- Draw and number the grid, then switch to the 5.5 mm hook.
Tracing the Strand
- Back, squares 1 to 16. Start at the bottom right. Work squares 1 to 4 right to left, 5 to 8 left to right, 9 to 12 right to left, and 13 to 16 left to right, joining each square to every finished neighbor and using the single-pass rule at every four-corner meeting.
- Right front, squares 17 to 22. Carry over the shoulder from the top of the back and snake down two columns, three rows deep, finishing square 22 at the hem.
- The neck-gap crossing. Between squares 22 and 23, keep the strand uncut. Bring it back along the shoulder and past the 11-inch, two-square opening without joining across it, so the neck stays open.
- Left front, squares 23 to 28. Begin at the left shoulder and snake down to the hem, mirroring the right front.
- Right sleeve, squares 29 to 33. Join five squares into a folded ring around the right armhole, closing the last square to the first.
- Left sleeve, squares 34 to 38. Repeat on the left side, ending at square 38 on the left cuff edge.
- Edges from the same strand. Without cutting, pick up 3 stitches per 2 clusters along the fronts, gather the cuffs to 7.5 to 8.5 inches, and work the collar and bands 1.5 inches deep.
Your Joining Evenings
At approximately 8 to 12 minutes per final round, all 38 joins take between 5 and 8 hours. Split that over two evenings for the body and a third for the sleeves: squares 1 to 22 on the first night, 23 to 28 plus the right sleeve on the second, then the left sleeve and ribbing on the third. When you fasten off after the last rib row, you will weave in one final tail.


Discussion
No comments yet. Be the first!
Write a Comment